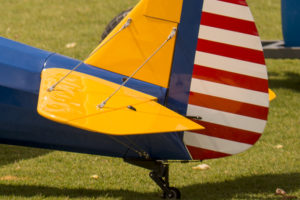
Now, now, let’s not go there. I’m not talking about working out to reduce flab. I want to talk a little about adding tail brace wires to your larger models. These suggestions may also be used on many smaller models.
 The main purpose of tail brace wires is to provide extra strength between the fuselage, stabilizer and the fin. Many models I have built have very little contact area between these parts, which often results in too little strength to hold these pieces together. Full size planes sometimes use lower braces only, or a combination of upper and lower braces to provide the required strength. Let’s take a look at several ways of building tail braces for your model.
Probably the easiest and lightest method of building tail braces is to use braided fishing leader connected to small metal brackets attached to the surfaces. This wire is available wherever fishing supplies are sold, and while you’re shopping, get a package of ferrules, the correct name of those little crimp-on sleeves used to join the wires permanently.
Holes drilled through balsa surfaces need to be reinforced to take the loads, and this should be done before covering, by drilling holes for sections of hardwood dowels or plywood glued in place and sanded smooth. Drill a hole for a 2-56 or 4-40 bolt to pass through, and you’re ready to add the braces. If your model is already covered in these areas, simply drill a hole for a piece of hard brass tubing through which you will later pass the bolt. This way, tightening the bolt and nut won’t crush or compress the soft wood. You also may want to use flat washers on each side of the surface for additional strength.
Now, using thin brass sheet, cut out enough brackets for the job, making them large enough for the shaft of the bolt and a hole for the wire. You can round off the corners to make these brackets look nicer. Bolt the bracket into place, tighten the bolt and nut (it may be a good idea to use an elastic stop nut (safety nut) here) and add a slight bend in the direction toward which the wire will be aimed.
The actual wires are added by slipping a ferrule over a section of wire, threading the wire through the hole in a bracket and looping the wire back through the ferrule. Bring the ferrule near the bracket and crimp the ferrule using one of those high-dollar crimping tools or a simple pair of pliers. Compress the ferrule enough to secure the wire from sliding out. Cut off the shorter end of the wire, then cut the wire about 6” longer than needed to reach the next bracket. Then repeat the fastening process, crimping the ferrules as you go.
If you are adding tail braces to larger models, you may want to consider using thimbles, a device through which the wire passes through the holes in the brackets, preventing the wire from rubbing and possibly breaking. You can get these thimbles, along with suitable stranded wire and ferrules at the “McMaster Carr” website. (www.mcmaster.com) Remember, Google is your friend.
Be careful not to pull the wires too tight before crimping the ferrules. Once all the wires are in place, the system will be tight and will keep the tail pieces very stable. Adjustable threaded ends and clevises can also be used if desired. You can find these at your local hobby dealer.
Another popular method of adding tail braces is the way that’s used on models like the SIG J-3 Cub, using 2-56 or 4-40 rods and clevises. Holes are drilled and reinforced as described earlier and then standard 2-56 or 4-40 clevises are modified as follows. Cur or break off the arm on the clevis that has the pin in it. Drill out the hole in the remaining arm to fit the bolt you plan to use to join the clevis to the desired surface. Thread the clevis to the threaded end of the rod, and use a nut to be used later to keep the joint tight and minimize vibration. Cut the other end of the rod to length, using a solder clevis to determine this length. Solder this clevis to the rod after cleaning it well and then bend the ends of each clevis so that they rest on the surfaces flat. Then, adjust the length of the rod to fit the space between the surfaces, bolt the rod into place and tighten the nut. Build the rest of the braces and you’re done. The only disadvantage of using wire rods rather than braided wires is that the rods and clevises weigh a bit more, which may be a problem on smaller and lighter models.
In either case, try not to tighten the braces any more than necessary. We’re not gonna play music with these wires, we just want to keep our tail in place. Other methods are equally acceptable, but the ones I have described here are inexpensive and easy to install on just about any model. Give ‘em a try.

